There are four different application processes that are supported by Online Mooring, and all of them work in a similar way. Those application processes are: Wait List Application (the initial application to get on a wait list), Wait List Renewal (an application to remain on the wait list for an additional period of time), Application (an application to be completed when the provider has availability), and Renewal (an application to extend the approval period).
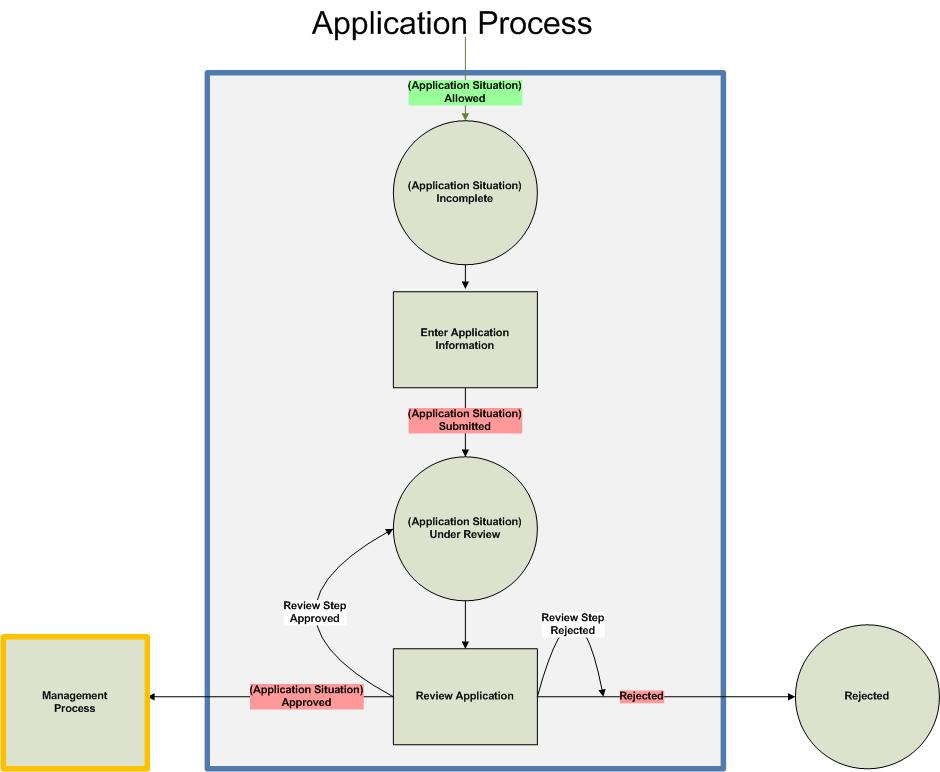
The diagram below shows how the application process works:
- Arrows represent Actions that are added to the application. The text on the arrow is the name of the action. The "(Application Situation)" text can be replaced by any of the four application process names: Wait List Application, Wait List Renewal, Application, or Renewal.
- Circles represent application statuses.
- Rectangles represent a processing step.
- Green means a required portion of the process.
- Red means an optional portion of the process.
 Starting the Process
The application process starts when an "Allowed" action is added to the application, which puts the application into an "Incomplete" status. When the status is Incomplete, the applicant has permission to complete the process.
When an applicant hits the "Apply" button in the "New Permit Application" section of their home page, the "Allowed" action is automatically added to the application. This allows applicants to submit wait list applications at any time, or to submit regular applications at any time (if there is no wait list).
For other application processes, the provider adds the "Allowed" action to the application. Since providers typically have a defined time period when the renewals need to be submitted, the provider enters the acceptable date range (starting from the Effective Date and ending on the Expiration Date) for the application to be submitted.
Submitting the Application
The applicant can submit their application online, or can submit their application in paper form.
If the applicant submits their application online, the "Submitted" action will be added automatically to the application when they click the "Save" button on the last page of the online application (the one where they need to accept the provider's Terms and Conditions). This will change the status to "Under Review".
If the applicant submits their application in paper form, the applicant enters the information into the database, and then adds a "Submitted" action manually, with the effective date being the date the provider received the application.
The "Submitted" action typically has a calculated fee that may be based in part upon the information entered on the most recent application.
Reviewing the Application
Some providers have a single-step approval process, and some have a multiple-step approval process.
Single-Step Approval Process
The provider looks at the information on the application, and decides whether to approve, reject, or wait before taking action. Typically, the review of the application includes the following:
- Making sure that the applicant has paid the necessary fees (there should be no outstanding balances on any of the actions)
- Making sure that the applicant has submitted all necessary supporting documentation (there should be no documents appearing in red)
- Making sure that the information contained in the application is "acceptable", which varies from one provider to another.
If the application looks good, the provider can click the "Approve" button in the action section. This button will only appear when the status is "Under Review". This will add an "Approved" action to the application.
If the application is not acceptable, the provider can click the "Reject" button in the action section. This button will only appear when the status is "Under Review". This will add a "Rejected" action to the application.
Multiple-Step Approval Process
Multiple-step approval steps are defined using the
Review Steps configuration screen.
Providers go to their
Dashboard page to see the review steps that currently need to be performed. By clicking on the review step, the provider will see a list of all applications in that step. For each application, the provider reviews the application and decides whether to approve, reject, or wait before taking action.
When going through the Dashboard and clicking on a review step, the "Approve" and "Reject" buttons will add a "Review Step Approved" action or a "Review Step Rejected" action. When the last step has been completed, an "Approved" action will be added automatically.
Afterwards
After approving a Wait List Application or a Wait List Renewal, the application goes on the wait list, and is handled by the provider using the
Wait List Management Process.
After approving an Application or a Renewal, the application is approved to be at a berth, and is handled by the provider using the
Berth Management Process